In the job knowledge series welding imperfections such as cracks, lack of fusion, penetration and porosity have been discussed. This article looks at those imperfections related to poor geometric shape and will concentrate on the following:
- Excess weld metal
- Undercut
- Overlap
- Linear misalignment
- Incompletely filled groove
Such imperfections might be considered as anomalies in the joint and they will always be present to some degree so that it becomes necessary to separate the acceptable from the unacceptable. This is done by following guidance given by the application standard, which was the basis for the component design, and/or by direction, as set out in the job contract. Examples of standards that might be referred to are:
- PD 5500 Specification for unfired fusion welded pressure vessels.
- BS EN ISO 5817 Welding. Fusion-welded joints in steel, nickel, titanium and their alloys (beam welding excluded). Quality levels for imperfections
- AWS D1.1 Structural welding code – Steel
Excess weld metal
(also called cap height, overfill or reinforcement)
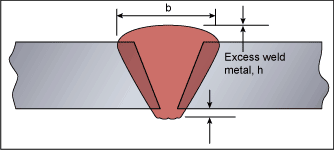
Fig.1. Excess weld metal
This is weld metal lying outside the plane joining the weld toes. Note that the term ‘reinforcement’, although used extensively in the ASME/AWS specifications is avoided in Europe as it implies it adds strength to the welded joint, which is rarely the case.
Common causes
This imperfection is formed when excessive weld metal is added to the joint, which is usually a result of poor welder technique for manual processes but may be due to poor parameter selection when the process is mechanised. That is, too much filler metal for the travel speed used. In multi-run welding a poor selection of individual bead sizes can result in a bead build-up pattern that overfills the joint. Different processes and parameters (eg voltage) can result in different excess weld metal shapes.
Acceptance
The acceptability of this imperfection is very dependent on the application in which the product will be used. Most standards have limit, related to material thickness (eg 10%), but also have a maximum upper limits. Both the ratio and the maximum may be related to the severity of service that the component is expected to see. The following table gives examples taken from BS EN ISO 5817.
| Excess weld metal limits for quality levels: | ||
| Severity of service | Moderate, D | Stringent, B |
| Limit (up to maximum) | h = 1mm + 0.25 b | h = 1mm + 0.1 b |
| Maximum | 10 mm | 5 mm |
| Transition required | smooth | smooth |
| Where: h = height of excess & b = width of bead (see figure 1) | ||
An important reason for limiting the height of excess weld metal is that it represents a non-value added cost. However, it must be remembered that the height of the weld cap influences the resultant toe blend. A sharp transition causes a local stress concentration that can contribute to loss of strength, which is particularly important in fatigue situations. As a result most specifications state that ‘smooth transition is required’.
Avoidance
If the imperfection is a result of welder technique then welder retraining is required. For mechanised techniques an increase in travel speed or voltage will help to reduce cap height.
Undercut
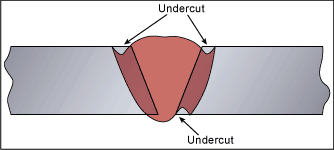
Fig.2. Undercut
This is an irregular groove at the toe of a run in the parent metal.
The figure shows undercut at surface of a completed joint but it may also be found at the toes of each pass of a multi-run weld. The latter can result in slag becoming trapped in the undercut region.
Common causes
When arc and gas welding, undercut is probably the most common shape imperfection. With single-sided pipe welds it may also be found at the bore surface. It may also be seen on the vertical face of fillet welds made in the horizontal vertical position.
A wide spreading arc (high arc voltage) with insufficient fill (low current or high travel speed) is the usual cause. However, welder technique, especially when weaving, and the way the welding torch is angled can both cause and be used to overcome undercutting (ie angled to push the weld metal to fill the melted groove). High welding current will also cause undercut – this is generally associated with the need for a high travel speed to avoid overfilling of the joint.
Acceptance
Largely because this imperfection is widespread, most standards permit some level of undercut although they do require that a ‘smooth transition is required. The limits in BS EN ISO 5817 range from 0.5mm (stringent) to 1mm (moderate) for thickness (t) greater than 3mm (more stringent limits are required for t 0.5 to 3mm), while AWS D1.1 has a limit of 1mm.
Measuring undercut can be a problem because of the small size of the imperfection compared with the general environment where there can be mill scale, irregularities in the surface and spatter.
In critical applications the imperfection can be ‘corrected’ by blend grinding or by depositing an additional weld bead.
Avoidance
This imperfection may be avoided by reducing travel speed and/or the welding current and by maintaining the correct arc length.
Overlap (cold lapping)
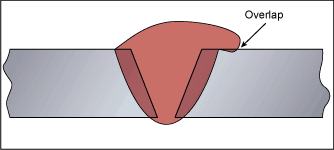
Fig.3. Overlap
This is an imperfection at a toe or root of a weld caused by metal flowing on to the surface of the parent metal without fusing to it. It may occur in both fillet and butt welds.
Common causes
This is often caused by poor manipulation of the electrode or welding gun, especially when the weld pool is large and ‘cold’, where the welder allows gravity to influence the weld shape before solidification. Tightly adherent oxides or scale on the metal surface can also prevent the weld metal fusing with the parent metal to cause the overlap imperfection.
Avoidance
Avoidance is achieved through an acceptable level of welder skill and a reduction in weld pool size (obtained by reducing current or increasing travel speed). Adequate cleaning of the parent plate is also important.
Acceptance
Standards rarely allow the presence of this imperfection, unless the length is short (eg BS EN ISO 5817 for moderate quality level D). Overlap can be very difficult to detect, especially if it is extremely small.
Linear misalignment
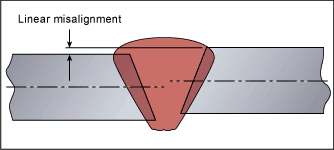
Fig.4. Linear Misalignment
(Also known in the USA as high-low).
This imperfection relates to deviations from the correct position/alignment of the joint.
Common causes
This is primarily a result of poor component fit-up before welding, which can be compounded by variations in the shape and thickness of components (eg out of roundness of pipe). Tacks that break during welding may allow the components to move relative to one another, again resulting in misalignment.
Acceptance
The acceptability of this defect is related to the design function of the structure or pipe line either in terms of the ability to take load across the misalignment or because such a step impedes the flow of fluid.
Acceptance varies with the application:
BS EN ISO 5817 relates misalignment to wall thickness but sets maximum limits (eg for material thickness t>3mm and moderate limits of imperfections D, = 0.25 x t, with a maximum of 5mm).
AWS D1.1 allows 10% of the wall thickness up to a maximum of 3mm.
The consequence of linear misalignment can, when welding is carried out from one side, be lack of root or sidewall fusion to give a sharp continuous imperfection along the higher weld face toe. In some situations linear misalignment in the bore of a pipe can lead to in-service problems where turbulence of the carrier fluid in the pipe creates subsequent erosion.
Stay tuned for part 2 in the November edition of WeldED!
